
Smart Vision 3 Assistant - User Guide

Installation
No installation is required. If on a hosted solution, just make sure you save/extract the files to a folder within the shared hosted environment.
The download file is a self-extracting zip file. Once it has downloaded, click Run or Open and then click UNZIP.
The default path is set to O:\DOWNLOAD\Smart_Assistant, but this may be changed to any folder location.
Smart Assitant is then ready to be used immeditaly as long as you have a licence.
Shared or Personal Smart Assistant
The application works within its own folder, which means all the files associated with the application must remain inside the same folder as the executable file.
When using it for all practice users, we recommend that you create a shortcut within Consultation manager > Local Guideline index, and point to the "Smart V3 Assistant.exe" executable file.
If you do not want to share Smart Assistant and you want to use your own personal version, just download and save it to another folder. You can then use the file menu to create a desktop shortcut.
How do you want Smart Assistant to open?
There are 2 options to how the application will open: Toaster pop-out or floating small toolbar button. This can be setup within the File menu.
- Toaster pop-out: will hide behind the right side of the screen. When you move your mouse screen pointer close to the right side of the screen area, it will pop-out
- Floating toolbar button; will show a small "Open" button on the right side of the screen area. Simply click this button to open Smart Assistant.
To hide Smart Assistant; click the hide button at the bottom of the application or use the file menu or press Ctrl+Shift+1 on your keyboard. Hold Ctrl and Shift keys down and tap on the number 1 key above the qwerty keys (not the numeric pad).
When most actions are performed using Smart Assistant it may automatically hide.
You can also minimise Smart Assitant to the Windows taskbar.
Add Saved Text
Note: Enter text exactly how you wish it to be entered when pasted into your application, i.e. you can include carriage returns.
Right mouse click (or use the Edit menu) to add your default text to Smart Assistant.
- Select Add Default Text
- Type out (or paste) your text to the edit field, exactly as you wish to see it added to another application.
- Enter a Topic reference as this may be used in a search to help reduce the list size of the saved text items
- Select from the “Send to” drop-down list. This will set the preferred target area for the text, when you want to use it.
- Clipboard: will copy the text to the Windows clipboard so that you may paste the text into any other applications text box.
- General Advice: is Vision 3 specific and will enter the text into the Advice entity within Consultation manager
- Therapy Advice: is the same as General, but will change the Type of advice given to "Therapy Advice". This will then include the advice on the right hand side of an issued script.
- SMS: is Vision 3 specific and will open the VisionPlus SMS for the patient in Consultation Manager and paste the saved text.
- V+ Template: This will save the text to the Windows clipboard, but will reformat the text into a single line, as VisionPlus templates will only accept a single line of text in the comments field.
If no selection is made from the “Send To” drop-down list it will default to clipboard
Note: There is an drop-down list option at the top of the window called “Send text to:” which will allow you to redirect the saved target to another place without changing the preferred default.
User is optional, but can be used in a filter drop-down list to reduce the list of items to a specific user.
Click Save to store the text. Which should now be added to the list view.
Use your Saved Text
Double-click on a line in the list view. This will use the assigned "Save to" target for your text, as explained above.
Alternatively, if you wish to send the saved text to a different target, use the “Save text to” drop down list at the top of the application page.
Search Saved text
Use the Word Search field to find matching words in the list view "Description" or "Topic" columns.
You may enter up to 3 words separated by spaces. These may also be partial words. When entering more than one word you can also define the search using the AND/OR options.
Click Run Search button to find any matches.
Click Reset List to clear any searches and return the list to show all
There are also option Send To and User drop-down filters. These are quick ways to filter the list view based on your selections.
User drop-down filter: This is built up from the Users you enter when saving the text into the Saved Text section.
VisionPlus SMS Settings
The SMS action for saved text uses the VisionPlus toolbar and the SMS position on the toolbar. This position may change if other features are added the V+ toolbar. In which case you can alter the steps in Smart Assitant from the File menu > V+ SMS Toolbar location.
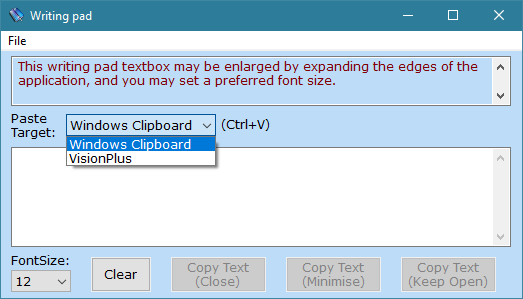
Writing Pad
The idea of the writing pad is to provide an area that suits your sight better. Where you can adjust the font size to suit, and expand the writing area up to full screen size if you wish.
When you have finshed your typing, simply click one of the Copy Text buttons to save your typed text to the Windows clipboard (default) ready for you to paste it into any application.
Paste Target "VisionPlus" also includes an option to save the text (on the Windows clipboard) as a single line, so that it may be pasted into the comments field of a VisionPlus template. (It removes all the carriage returns.)
- Writing pad will also automatically save the last selected font size.
- To save the preferred position of the application when opened, click the File menu and select "Save Gui Position", ready for when you open it again.
- The application typing area will always open at the default minimal size.
- Use the corners of the application to expand the writing area to your preferred setting. When the mouse pointer changes to a double-ended arrow cursor, hold the mouse button and drag the mouse to expand/contract the application. Release the mouse button when at your preferred size.
Paste Text
Note: some applications may not show the context mouse menu for paste. In which case simply use the Windows keyboard shortcut of Ctrl+V. Hold the Ctrl key down on the keyboard and tap on the letter V to paste the last saved text added to the Windows clipboard at the mouse text cursor position.
Copy NHS/CHI/H+C number
This feature will copy the NHS/CHI/H+C number to the Windows clipboard , ready to be pasted into any application.
It is country specific, so the button text in Smart Assistant will change as follows:
- Scotland: CHI No.
- Northern Ireland: H+C No.
- England and Wales: NHS No.
The NHS/CHI/H+C number must be displayed in the top title bar of Consultation Manager (Vision 3), when you have selected a patient. If this is not displayed, update your Consultation Manager Title format settings as follows: Click the Consultation menu > Options > Setup. Select the General tab and tick Include NHS/CHI/H+C number
Directions
This feature will capture the patients address and open Google maps in the default web browser to provide directions from the surgery.
On first use it will ask for the practice postcode or address. This may be changed via the File menu > Update Practice Postcode.
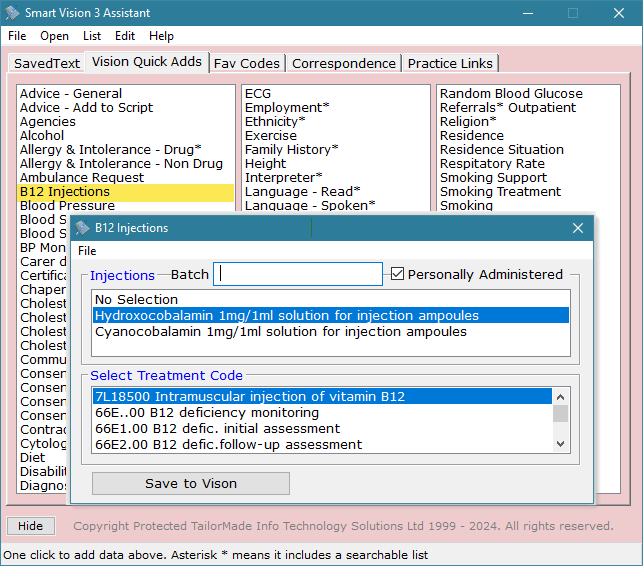
Vision Quick Adds
The aim of these actions are to provide a quick method of opening and recording popular events.
These actions will simply open the default Vision entity in the patient record, they will not automatically record the event.
Where there maybe multiple clinical codes, further options may be presented to help you get to the correct event.
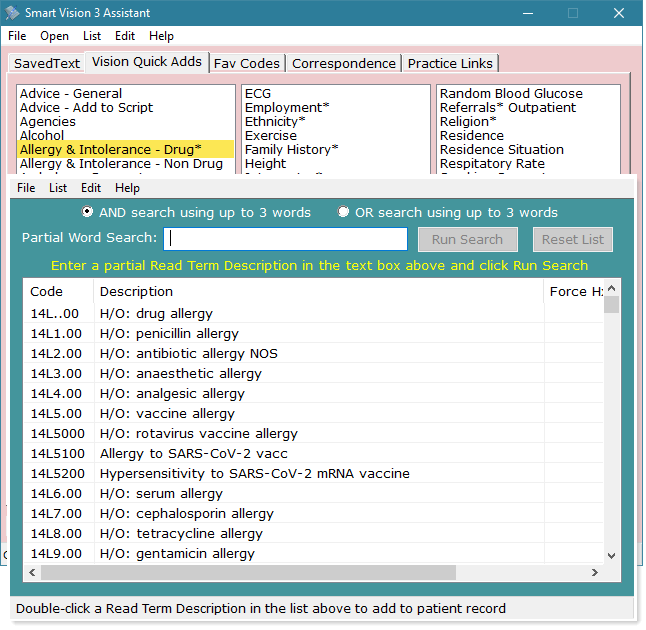
These are all hardcoded preset actions. Actions marked with an asterisk will display a lookup list, to allow you to search for the clinical code description.
Some actions like Minor Surgery, B12 and Prostap injections will allow you to enter batch numbers and define the listed drug names via the File menu.
Favourite Codes
This is mainly to do with setting up all the controls within the general medical history entity, so data can be entered quickly based on preset favourite READ2 codes. This also include preset free text comments.
You must add the full clinical READ2 code made up of 7 alphanumeric characters. 5 primary characters and the last 2 synonym numeric characters. These characters are case sensitive and the first alphabetical character must be written in uppercase. READ2 clinical condition chapters range from 1 to 9 and A to Z.
The clinical codes need to be known, as there is no lookup feature within Smart Assistant. Therefore use the Vision 3 clinical read code lookup feature in Consultation Manager, set behind the READ Term - Add control.
There is also an option for SDA's, but this will simply open the default entity assigned by Vision 3 based on the READ2 code you enter.
An SDA (Structured Data Area) is an entity other than a medical history which is specific to the type of data entry, such as BP, Weight, Smoking, Cholesterol, etc...these entities have specifically assigned READ2 codes already in them for you to select from a drop-down list or other options.
Save a favourite code
Right mouse click on the list view or use the Edit menu and select “Add Read Code”. You can then choose to setup a READ2 code in a medical history or SDA.
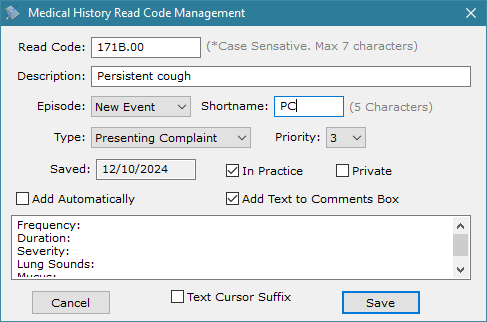
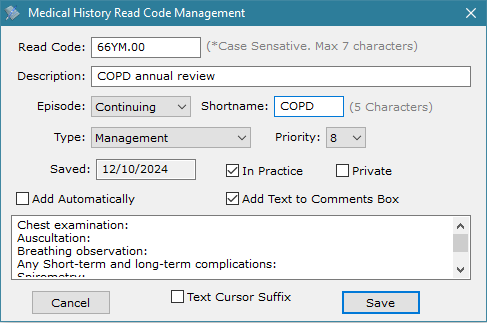
Medical History:
- Read Code: Enter the full READ2 code. Note that the READ2 code cannot be verified as correct within Smart Assistant. If entered wrong it will simply fail or select the wrong term when be recorded into the clinical system.
- Description is mandatory, but doesn’t necessarily need to be the exact term assigned to the READ2 code. It is for your own reference purpose. However, please note that it will use the specific term description of the READ2 code when recorded into the clinical system.
- Episode type is mandatory. Choose from the drop-down list
- Type (Characteristic type) is mandatory, and enables you to setup selections from the drop-down list that are never selected by default within the clinical system, such as “Presenting Complaint” and “Management”, or you may prefer to use a different type from the default selected in Vision for the specific READ2 code.
- Priority is mandatory and provides a quick method for creating a system for specific priority numbers, around the type of clinical code(s) being entered, making searching within the patient record and via searches and reports easier.
- In Practice tick box. The default setting in the clinical system is that it is always ticked. This allows you to change the default for a particular code.
- Private tick box. Check this to record private consultations.
- Add Text to Comments box: Enter default comments to save typing them out everytime, such as checks lists for annual review or certain conditions as reminder to carry out these tasks.
- Add Automatically checkbox: This will automatically enter the data into the clinical system using all the presets mentioned above. If unchecked it will enter all the presets, but the medical history entity will remain open to allow you to make any changes before commiting to save the data to the patient record.
Click the Save button to store the favorite code in the list for future use.
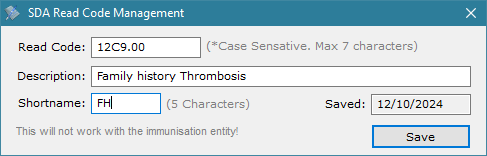
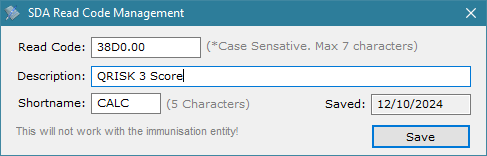
SDA
This allows you to save popular codes for quick data entry, rather than having to keep searching for the code each time.
- Read Code: Enter the full READ2 code. Note that the READ2 code cannot be verified as correct within Smart Assistant. If entered wrong it will simply fail or select the wrong term when be recorded into the clinical system.
- Description is mandatory, but doesn’t necessarily need to be the exact term assigned to the READ2 code. It is for your own reference purpose. However, please note that it will use the specific term description of the READ2 code when recorded into the clinical system.
- Shortname: This allows for grouping and is used in the search field filter. It allows you to enter a single group name to display all the codes assigned to the shorname in the list view.
Use a Favorite code
Double-click on a favorite code in the list to start the data entry. A patient record and consultation must be started in Consultation manager.
Correspondence
These are shortcut links to Vision 3 mail merge documents normally located in P:\WORDPROC\TEMPLATE. Although this application allows you to use mail merge documents located in any folder, as it consolidates them into this single list from any folder location, for everyone to quickly find and use all clinical practice documents.
This feature also has the added benefit that staff do not accidentally drag documents into the wrong folders, so others can no longer find them!
Mail Merge Fields
All the document added here will be opened in either a Clinical Correspondence (Letter) or Referral entity and therefore MUST include merge fields in each document, otherwise Vision will fail to open the document.
There are 4 mail merge options in Vision 3; Practice, Patient, Referral and Recall. Selecting:
- Practice includes no other merge fields
- Patient also includes Practice merge fields
- Referral also includes Practice and Patient merge fields
- Recall also includes Practice and Patient merge fields
When using the Clinical Correspondence entity, the "Type of Letter" drop-down list includes other choices. These must include certain mail merge fields, which are shown in brackets when adding a document to this Correspondence application.
For example selecting "Recall" means that a at least one recall merge field must exist in the document.
Add Correspondence
- Right mouse click on the list view (or use the Edit menu) and select "Add Document"
- Click the Browse button to select the mail merge document you wish to include in the list, by navigating the Windows explorer folders. It will default to P:\WORDPROC\TEMPLATE, but you may select any mail merge document from any location.
Once selected you will be returned to the Manage Correspondence screen, which will show the folder path of where this document is located and automatically add the document name to the Summary Details field.
The Summary Details text will be added to Vision Clinical Correspondence entity Summary field, together with the Type of Letter information selected from the drop-down list (Useful in Search & Reports)
Click View document to open the document in Edit mode i.e. not using the clinical system. This allows you to check you have the correct document, and provides a quick and easy opportunity to make any amendments to the document template.
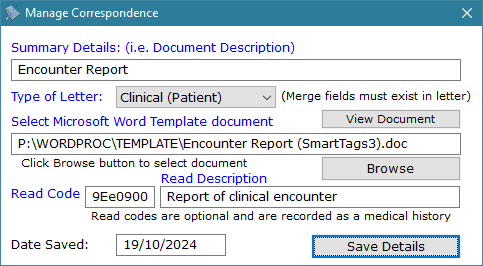
Clinical Code (Optional)
You may also assign a clinical code to this document. This will be added first to the patient record, and the letter will open after you have closed the Vision entity opened for this code.
Note that the READ2 code cannot be verified as correct within Smart Assistant. If entered wrong it will simply fail or select the wrong term when be recorded into the clinical system.
The Read Term description is for reference purposes only within Smart Assistant, and allows you to enter any description, but it will use the assigned Read code description when entered into the patient record.
Record Correspondence
A consultation must be started to use this feature!
1. Double-click on a document line in the list view to launch the corresponding document in the patient record.
2. The
Select Entity Type option will be displayed, allowing you to choice which entity you would like to open the document in within Vision.
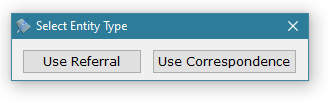
3. Select Use Referral to simply open the mail merge document using the Referral form in Vision.
4. Selecting
Use Correspondence will open the entity for any optional clinical READ2 code you have included to describe this document. Once you have close this entity, it will open the mail merge document using the Clinical Correspondence form in Vision, and enter the summary details and type of letter choice.
Practice Links
Right mouse click on the list view or use the Edit menu and select “Add New Link”

")